
Let's Learn
How to Import Items Using Our Template
Step 1. If you haven't already, download our Import Template and Guidelines
Step 2. After you've created your file, go to Items > Import Items
Step 3. In the Select CSV File of Items section, click Browse to select your file from your computer.
-
- You can import images along with your item import. Create a zip file of images, then go to Select Zip File with Item Images and click Browse to select the zip file from your computer.
-
In order to import images, you must include the images' file names in the Item Image column (Please see our template). If the image's file name is polarbear.jpg, then you would include that in the Item Image column for that specific item. You must include the file extension (jpg, gif, or png) with the file name.
-
You can include an unlimited number of images for each item. To do that, include a double colon ("::" without the quotation marks) between each of the image file names in the Item Image column.
-
Next, you need to zip all of the image files together in one zip file. See How to Create a Zip file.
-
Then to import the images with your items, go to Items > Import Items. Upload the spreadsheet in the first field and the zip file in the second field on that page.
-
Make sure your images fit our Image Requirements.
-
Image won't upload? See Image Help.
Step 4. Click Import Items
Step 5. You'll receive an email (typically within 15 minutes) to let you know your import is complete. If there are any errors, the email will list all of the errors and how to correct them.
Note: You may want to consider entering two items manually, then exporting them to a CSV. This way you are provided with an Import Template that is formatted correctly.
To create an item manually, click the Items tab > Create Items. Enter in the appropriate information. Once your items are added, click the Items tab > Export Items.
What to do if the Import Fails
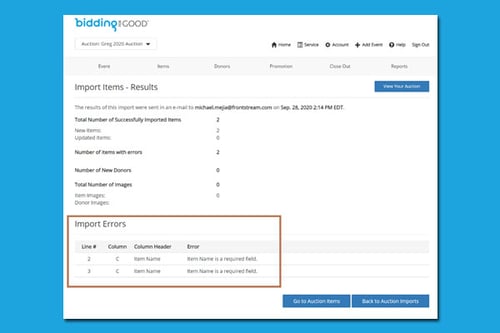
Once the import is complete, you will receive an automatic Item Import Email, which will provide you with confirmation to let you know if the files were imported successfully or if it failed. If it failed, the message will include a list of which rows and columns had errors in them. Once you make the corrections, you should go back to Items > Import Items and import the file again.
In addition to the Item Import Email, you can now see all item import results on the Import History page, to determine if updates are necessary to columns, fields, or labels for auction items that may need manual input. The Import History page makes it easier to view and act on any import information.
If some rows succeeded and others failed, you may want to only import the rows that failed again (after making the corrections, of course). If you're uncertain of what fields are required and how to input information in your spreadsheet, please refer to our Import Items Formatting Guideline requirements.
Comments
0 comments
Article is closed for comments.